AWS IAM Roles - Comprehensive Guide
Table of Contents
1. IAM Roles Overview
AWS IAM Roles are a secure way to grant permissions to entities that you trust. Unlike IAM users, roles don't have permanent credentials. Instead, they provide temporary security credentials through the AWS Security Token Service (STS).
graph TD
A[IAM Role] --> B[Trust Policy]
A --> C[Permission Policies]
B --> D[Who can assume the role]
C --> E[What actions are allowed]
F[AWS Service] --> G[AssumeRole API]
G --> H[Temporary Credentials]
H --> I[Access AWS Resources]
style A fill:#3498db,stroke:#2980b9,stroke-width:3px,color:#fff
style B fill:#e74c3c,stroke:#c0392b,stroke-width:2px,color:#fff
style C fill:#27ae60,stroke:#229954,stroke-width:2px,color:#fff
style H fill:#f39c12,stroke:#e67e22,stroke-width:2px,color:#fff
Diagram Explanation: This diagram shows the fundamental structure of IAM Roles. The role itself contains two main components: the Trust Policy (which defines who can assume the role) and Permission Policies (which define what actions the role can perform). When an entity assumes the role, it receives temporary credentials that provide access to AWS resources.
2. Architecture & Traffic Flow
2.1 Cross-Account Role Assumption Flow
sequenceDiagram
participant U as User/Service
participant STS as AWS STS
participant R as IAM Role
participant T as Target Resource
U->>STS: AssumeRole Request
STS->>R: Validate Trust Policy
R->>STS: Trust Policy Check
STS->>U: Temporary Credentials
U->>T: Access Resource with Temp Creds
T->>U: Resource Response
Note over U,T: Credentials expire after session duration
Sequence Flow Explanation: This shows the complete flow of role assumption. The user or service makes an AssumeRole request to STS, which validates the trust policy. Upon successful validation, STS returns temporary credentials (access key, secret key, and session token) that the user can use to access AWS resources. These credentials automatically expire after the specified session duration.
2.2 EC2 Instance Role Flow
graph LR
A[EC2 Instance] --> B[Instance Profile]
B --> C[IAM Role]
C --> D[Permission Policies]
A --> E[Instance Metadata Service]
E --> F[Temporary Credentials]
F --> G[AWS API Calls]
G --> H[AWS Services]
style A fill:#ff9999,stroke:#ff6666,stroke-width:3px
style B fill:#99ccff,stroke:#6699ff,stroke-width:2px
style C fill:#99ff99,stroke:#66ff66,stroke-width:2px
style F fill:#ffcc99,stroke:#ff9966,stroke-width:2px
EC2 Instance Role Flow: EC2 instances use Instance Profiles to assume roles. The instance profile acts as a container for the IAM role. The EC2 instance retrieves temporary credentials from the Instance Metadata Service (IMDS) and uses them to make AWS API calls. This eliminates the need to store long-term credentials on the instance.
2.3 Service-to-Service Communication
graph TB
subgraph "Account A"
A1[Lambda Function] --> A2[Execution Role]
A2 --> A3[AssumeRole Permission]
end
subgraph "Account B"
B1[Cross-Account Role] --> B2[Trust Policy]
B2 --> B3[Allows Account A]
B1 --> B4[Permission Policies]
B4 --> B5[S3 Access]
end
A3 --> B1
B1 --> B6[S3 Bucket]
style A1 fill:#3498db,stroke:#2980b9,stroke-width:2px,color:#fff
style B1 fill:#e74c3c,stroke:#c0392b,stroke-width:2px,color:#fff
style B6 fill:#27ae60,stroke:#229954,stroke-width:2px,color:#fff
Cross-Account Service Communication: This diagram illustrates how services in different AWS accounts communicate securely. The Lambda function in Account A has an execution role with permissions to assume a cross-account role in Account B. The cross-account role's trust policy explicitly allows Account A to assume it, and its permission policies grant access to specific resources like S3 buckets.
3. Key Components
3.1 Role Components Relationship
graph TD
A[IAM Role] --> B[Role Name]
A --> C[Role ARN]
A --> D[Trust Policy Document]
A --> E[Permission Policies]
A --> F[Tags]
A --> G[Max Session Duration]
D --> H[Principal Element]
D --> I[Action Element]
D --> J[Condition Element]
E --> K[AWS Managed Policies]
E --> L[Customer Managed Policies]
E --> M[Inline Policies]
style A fill:#9b59b6,stroke:#8e44ad,stroke-width:3px,color:#fff
style D fill:#e74c3c,stroke:#c0392b,stroke-width:2px,color:#fff
style E fill:#27ae60,stroke:#229954,stroke-width:2px,color:#fff
Role Components Breakdown: This diagram shows all the components that make up an IAM role. The Trust Policy Document contains principals (who can assume), actions (typically sts:AssumeRole), and conditions (additional constraints). Permission Policies can be AWS managed (maintained by AWS), customer managed (maintained by you), or inline (embedded directly in the role).
4. Setup Sequence & Command Flow
4.1 Role Creation Command Sequence
graph TD
A[1. Create Trust Policy JSON] --> B[2. Create IAM Role]
B --> C[3. Create Permission Policy JSON]
C --> D[4. Create/Attach Policy]
D --> E[5. Create Instance Profile]
E --> F[6. Add Role to Instance Profile]
F --> G[7. Attach to EC2 Instance]
H[Alternative: Use Existing AWS Managed Policy] --> D
style A fill:#3498db,stroke:#2980b9,stroke-width:2px,color:#fff
style B fill:#e74c3c,stroke:#c0392b,stroke-width:2px,color:#fff
style D fill:#27ae60,stroke:#229954,stroke-width:2px,color:#fff
style E fill:#f39c12,stroke:#e67e22,stroke-width:2px,color:#fff
Command Sequence Flow: This shows the logical order for creating IAM roles. You start by defining the trust policy (who can assume the role), then create the role itself. Next, you define permission policies (what the role can do) and attach them. For EC2 instances, you also need to create an instance profile and associate it with the role.
5. Detailed Configurations
5.1 Trust Policy Configuration
Step 1: Create the trust policy document first - this defines who can assume the role.
{
  "Version": "2012-10-17",
  "Statement": [
    {
      "Effect": "Allow",
      "Principal": {
        "Service": "ec2.amazonaws.com"
      },
      "Action": "sts:AssumeRole"
    }
  ]
}
Trust Policy Parameters:
Version: Policy language version (always use "2012-10-17")Effect: "Allow" or "Deny" - controls whether the statement allows or denies accessPrincipal: Specifies who can assume the role (Service, AWS account, IAM user, etc.)Action: "sts:AssumeRole" is the standard action for role assumption
"AWS": "arn:aws:iam::123456789012:root"- Entire AWS account"AWS": "arn:aws:iam::123456789012:user/username"- Specific IAM user"Federated": "arn:aws:iam::123456789012:saml-provider/provider-name"- SAML provider
5.2 Role Creation Command
Step 2: Create the IAM role using the trust policy document.
aws iam create-role \
    --role-name MyEC2Role \
    --assume-role-policy-document file://trust-policy.json \
    --description "Role for EC2 instances to access S3 and CloudWatch" \
    --max-session-duration 3600
Create Role Parameters:
--role-name: Name for the role (required, must be unique within account)--assume-role-policy-document: Trust policy (required, can be inline or file://)--description: Human-readable description (optional but recommended)--max-session-duration: Maximum session duration in seconds (3600-43200, default: 3600)--path: Path prefix for organizing roles (optional, default: /)--tags: Key-value pairs for resource tagging (optional)
5.3 Permission Policy Configuration
Step 3: Define what the role can do by creating permission policies.
{
  "Version": "2012-10-17",
  "Statement": [
    {
      "Effect": "Allow",
      "Action": [
        "s3:GetObject",
        "s3:PutObject",
        "s3:DeleteObject"
      ],
      "Resource": [
        "arn:aws:s3:::my-bucket/*"
      ]
    }
  ]
}
Permission Policy Parameters:
Action: Specific API actions the role can perform (can use wildcards like s3:*)Resource: ARN of resources the actions can be performed on (* for all resources)Condition: Additional constraints (optional, e.g., IP restrictions, MFA requirements)
s3:*: All S3 actionslogs:CreateLogGroup: CloudWatch Logs specific actionec2:Describe*: All EC2 describe actions
5.4 Policy Creation and Attachment
Step 4: Create and attach the permission policy to the role.
aws iam create-policy \
    --policy-name MyS3AccessPolicy \
    --policy-document file://permission-policy.json \
    --description "Allows S3 access for application data"
Create Policy Parameters:
--policy-name: Name for the policy (required)--policy-document: Policy JSON document (required)--description: Policy description (optional)--path: Path for organizing policies (optional, default: /)
aws iam attach-role-policy \
    --role-name MyEC2Role \
    --policy-arn arn:aws:iam::123456789012:policy/MyS3AccessPolicy
Attach Policy Parameters:
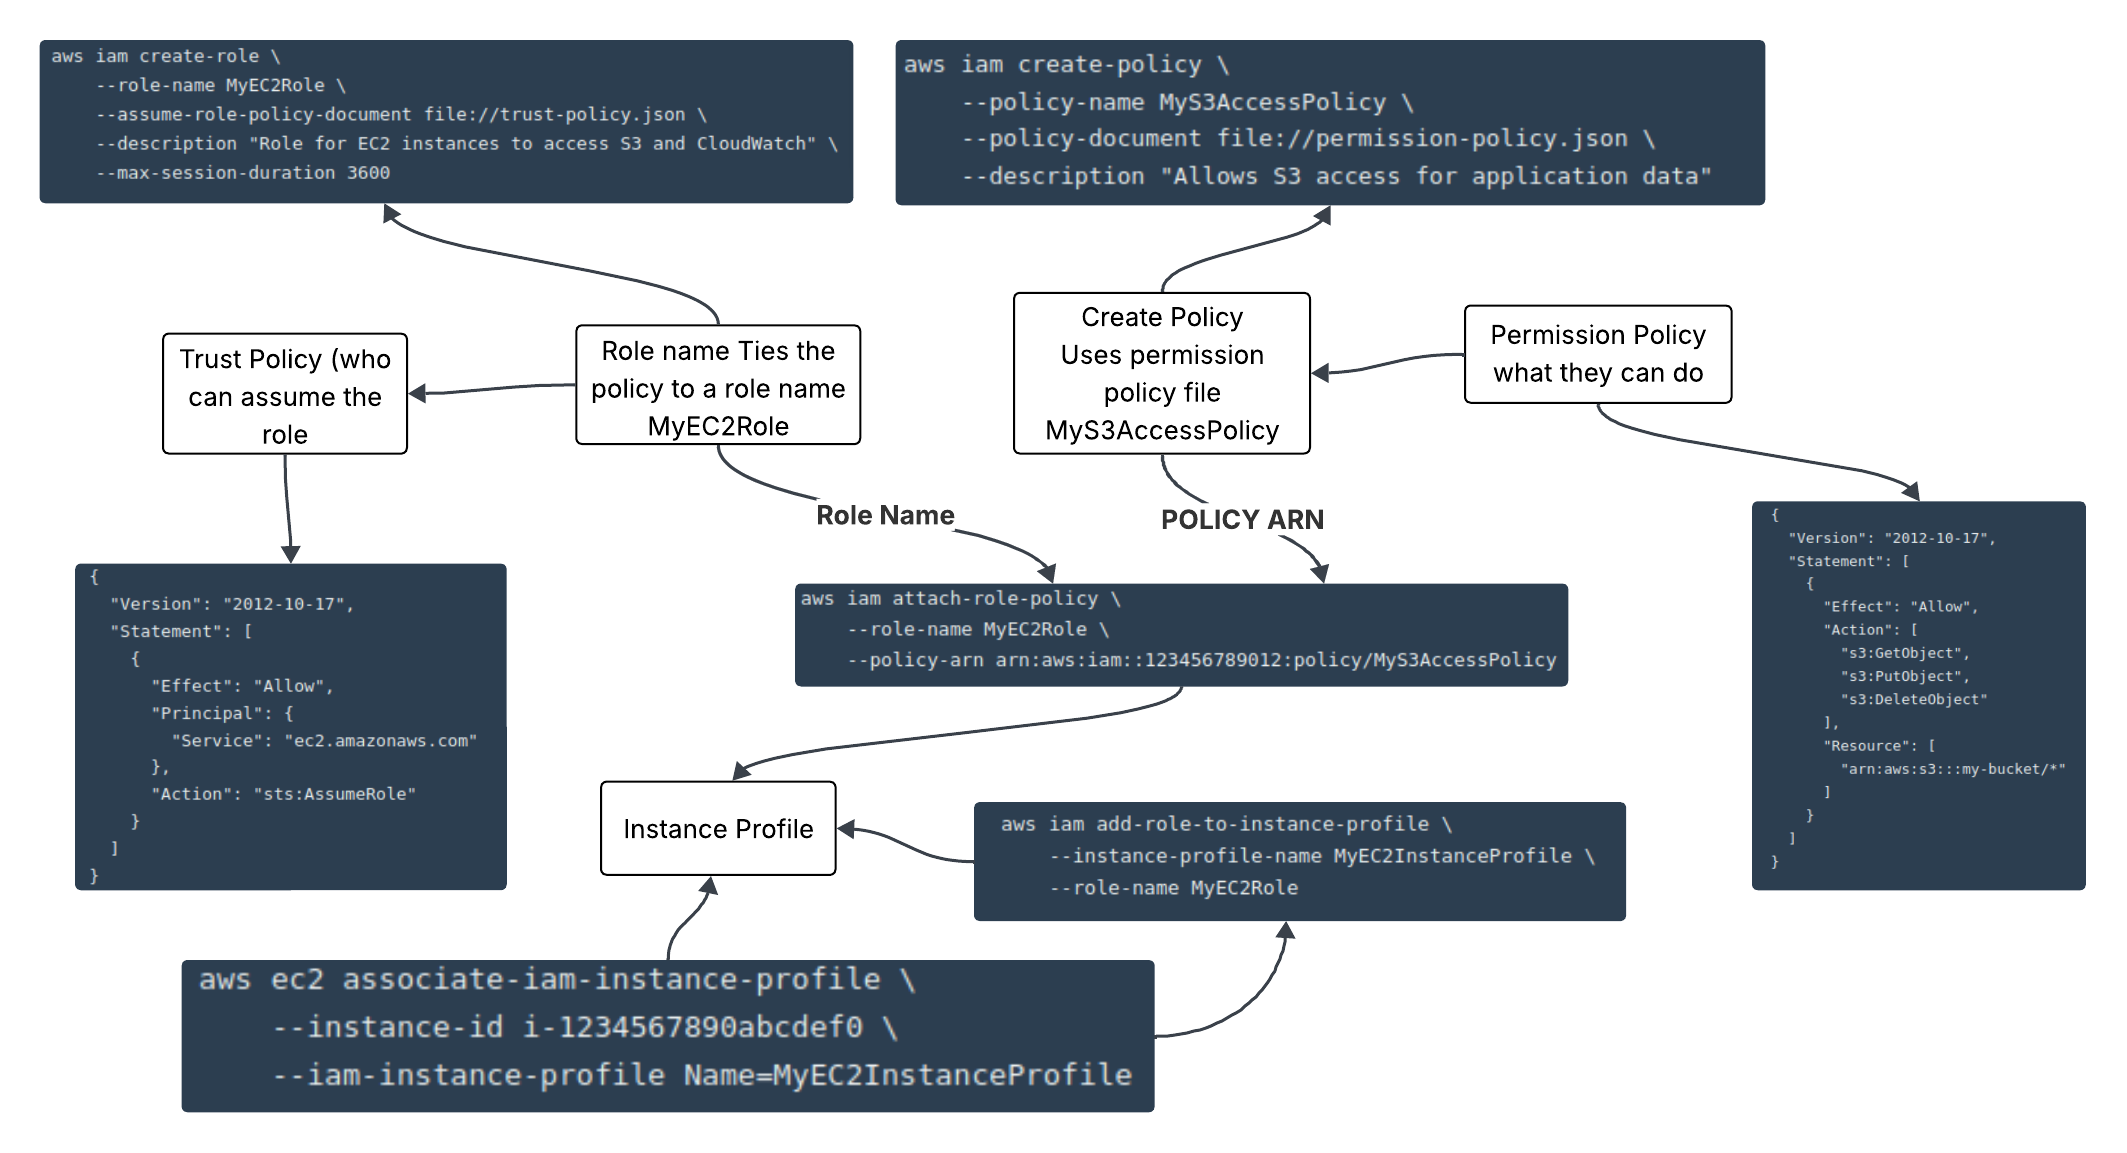
--role-name: Name of the role to attach policy to--policy-arn: ARN of the policy to attach
--policy-arn arn:aws:iam::aws:policy/AmazonS3ReadOnlyAccess
5.5 Instance Profile Configuration
Step 5: Create an instance profile (required for EC2 instances).
aws iam create-instance-profile \
    --instance-profile-name MyEC2InstanceProfile \
    --path /
Instance Profile Purpose:
Instance profiles are containers for IAM roles that EC2 instances can use. They provide a way for EC2 instances to assume roles without storing credentials on the instance.
--instance-profile-name: Name for the instance profile--path: Path for organizing instance profiles (optional)
aws iam add-role-to-instance-profile \
    --instance-profile-name MyEC2InstanceProfile \
    --role-name MyEC2Role
Add Role to Instance Profile:
This command associates the IAM role with the instance profile. An instance profile can contain only one role.
5.6 EC2 Instance Association
Step 6: Associate the instance profile with an EC2 instance.
aws ec2 associate-iam-instance-profile \
    --instance-id i-1234567890abcdef0 \
    --iam-instance-profile Name=MyEC2InstanceProfile
Associate Instance Profile:
This command attaches the instance profile to a running EC2 instance. The instance will then be able to assume the role and access AWS resources according to the attached policies.
--instance-id: ID of the EC2 instance--iam-instance-profile: Name or ARN of the instance profile
6. Common Use Cases
6.1 Cross-Account Access Pattern
graph LR
subgraph "Production Account"
P1[Lambda Function] --> P2[Dev Access Role]
end
subgraph "Development Account"
D1[Cross-Account Role] --> D2[S3 Bucket]
D1 --> D3[CloudWatch Logs]
D1 --> D4[DynamoDB Table]
end
P2 --> D1
style P1 fill:#3498db,stroke:#2980b9,stroke-width:2px,color:#fff
style D1 fill:#e74c3c,stroke:#c0392b,stroke-width:2px,color:#fff
style D2 fill:#27ae60,stroke:#229954,stroke-width:2px,color:#fff
Cross-Account Access Use Case: This shows how a Lambda function in a production account can access resources in a development account. The Lambda has a role with permissions to assume a cross-account role in the development account, which then provides access to development resources.
6.2 Cross-Account Role Trust Policy
{
  "Version": "2012-10-17",
  "Statement": [
    {
      "Effect": "Allow",
      "Principal": {
        "AWS": "arn:aws:iam::PROD-ACCOUNT-ID:role/DevAccessRole"
      },
      "Action": "sts:AssumeRole",
      "Condition": {
        "StringEquals": {
          "sts:ExternalId": "unique-external-id"
        },
        "IpAddress": {
          "aws:SourceIp": "203.0.113.0/24"
        }
      }
    }
  ]
}
Cross-Account Trust Policy Features:
Principal: Specifies the exact role from the production accountsts:ExternalId: Additional security measure for third-party accessaws:SourceIp: Restricts access based on source IP address
aws:RequestedRegion: Restrict to specific AWS regionsaws:MultiFactorAuthPresent: Require MFA for role assumptionaws:CurrentTime: Time-based access restrictions
6.3 Service-Linked Role Pattern
graph TD
A[AWS Service] --> B[Service-Linked Role]
B --> C[Predefined Policies]
C --> D[Service-Specific Permissions]
E[User/Admin] --> F[Create Service]
F --> G[Automatic Role Creation]
G --> B
style A fill:#ff6b6b,stroke:#ee5a52,stroke-width:2px,color:#fff
style B fill:#4ecdc4,stroke:#45b7aa,stroke-width:2px,color:#fff
style C fill:#45b7d1,stroke:#3498db,stroke-width:2px,color:#fff
Service-Linked Role Pattern: Service-linked roles are created automatically by AWS services when you create certain resources. They have predefined permissions that the service needs to operate. Examples include roles for ECS services, Lambda functions, and Auto Scaling groups.
7. Best Practices
7.1 Role Security Model
graph TD
A[Security Best Practices] --> B[Principle of Least Privilege]
A --> C[Regular Policy Review]
A --> D[Use Conditions]
A --> E[Monitor Role Usage]
B --> F[Specific Actions Only]
B --> G[Specific Resources Only]
C --> H[Quarterly Reviews]
C --> I[Remove Unused Roles]
D --> J[IP Restrictions]
D --> K[Time-Based Access]
D --> L[MFA Requirements]
E --> M[CloudTrail Logging]
E --> N[Access Analyzer]
style A fill:#8e44ad,stroke:#7d3c98,stroke-width:3px,color:#fff
style B fill:#e74c3c,stroke:#c0392b,stroke-width:2px,color:#fff
style E fill:#f39c12,stroke:#e67e22,stroke-width:2px,color:#fff
Security Best Practices: This diagram outlines the key security practices for IAM roles. Always follow the principle of least privilege, regularly review and clean up unused roles, use conditions to add additional security layers, and monitor role usage through CloudTrail and Access Analyzer.
Important Security Considerations:
- Never use wildcards (*) in production unless absolutely necessary
- Always use specific resource ARNs rather than allowing access to all resources
- Implement external ID for third-party access scenarios
- Use temporary credentials wherever possible
- Enable CloudTrail to monitor all role assumptions and API calls
7.2 Complete Role Creation Script
Complete Setup Script: Here's a comprehensive script that creates a role with all components.
#!/bin/bash

# Step 1: Create trust policy
cat > trust-policy.json << EOF
{
  "Version": "2012-10-17",
  "Statement": [
    {
      "Effect": "Allow",
      "Principal": {
        "Service": "ec2.amazonaws.com"
      },
      "Action": "sts:AssumeRole"
    }
  ]
}
EOF

# Step 2: Create the role
aws iam create-role \
    --role-name MyApplicationRole \
    --assume-role-policy-document file://trust-policy.json \
    --description "Role for application servers"

# Step 3: Create permission policy
cat > permission-policy.json << EOF
{
  "Version": "2012-10-17",
  "Statement": [
    {
      "Effect": "Allow",
      "Action": [
        "s3:GetObject",
        "s3:PutObject"
      ],
      "Resource": [
        "arn:aws:s3:::my-app-bucket/*"
      ]
    }
  ]
}
EOF

# Step 4: Create and attach policy
aws iam create-policy \
    --policy-name MyApplicationPolicy \
    --policy-document file://permission-policy.json

aws iam attach-role-policy \
    --role-name MyApplicationRole \
    --policy-arn arn:aws:iam::$(aws sts get-caller-identity --query Account --output text):policy/MyApplicationPolicy

# Step 5: Create instance profile
aws iam create-instance-profile \
    --instance-profile-name MyApplicationProfile

# Step 6: Add role to instance profile
aws iam add-role-to-instance-profile \
    --instance-profile-name MyApplicationProfile \
    --role-name MyApplicationRole

echo "Role setup complete!"
Script Explanation:
This script demonstrates the complete process of creating an IAM role with all necessary components. It creates the trust policy, the role itself, permission policies, and the instance profile. The script uses command substitution to dynamically get the account ID for the policy ARN.
7.3 Verification Commands
# Verify role creation
aws iam get-role --role-name MyApplicationRole

# List attached policies
aws iam list-attached-role-policies --role-name MyApplicationRole

# Check instance profile
aws iam get-instance-profile --instance-profile-name MyApplicationProfile

# Test role assumption (if you have permissions)
aws sts assume-role \
    --role-arn arn:aws:iam::123456789012:role/MyApplicationRole \
    --role-session-name TestSession
Verification Commands:
These commands help verify that your role was created correctly and is functioning as expected. Use them to troubleshoot any issues with role creation or permission assignments.